Today, I want to share some key ideas on how I target
Achilles tendon adaptation during rehab for Achilles tendinopathy. There are a
few important factors to consider:
We
need to avoid provoking symptoms while ensuring we provide enough stimulus
for tendon adaptation.
The
overall load the person or athlete is managing must be feasible and allow
for proper recovery.
I won’t cover everything here, but I’ll introduce my
framework for tendon adaptation in rehab.
For practical applications for lower limb
tendinopathies, join mein person for my new course: Tendinopathy
Rehab: Structured Frameworks and Practical Strategies in Melbourne on
May 3-4👉Register
here.
An online version of this course will be launching in
a few weeks—stay tuned!
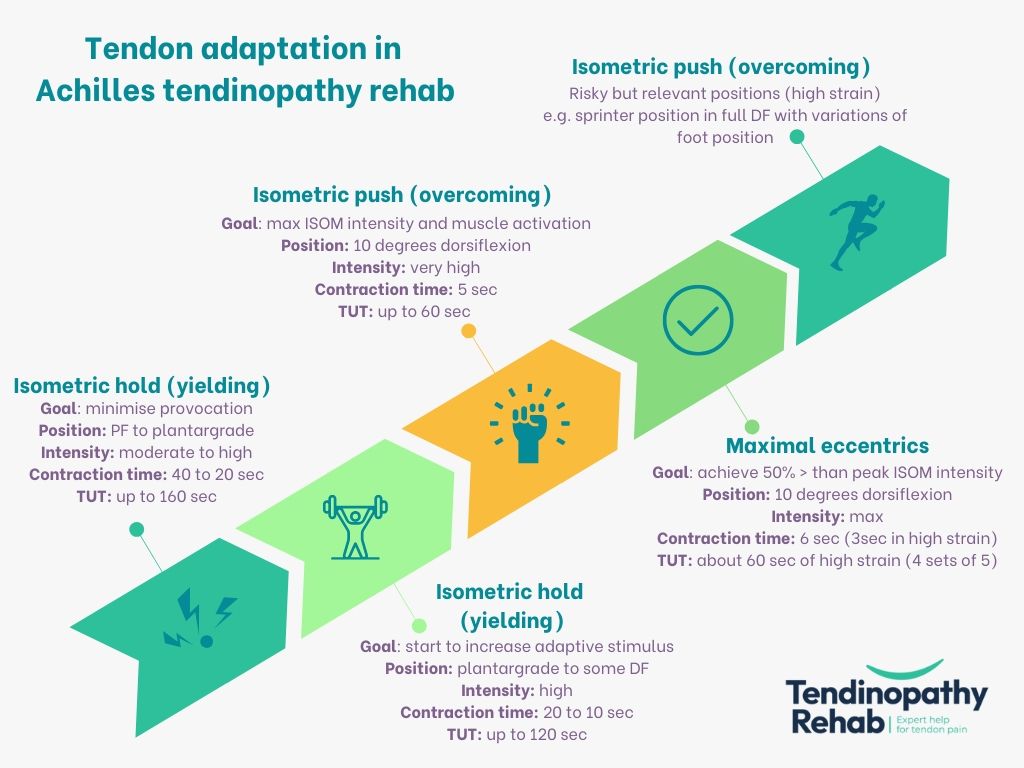
Below is the framework, outlining exercise options to maximise
tendon adaptation at different rehab stages. Key considerations include:
Five exercise options for tendon adaptation: This
framework includes five options – please see the figure. The last one is likely
to be the least familiar. Here, I aim to mimic positions where the tendon
experiences the highest strain—similar to those where acute partial tears and
ruptures typically occur.
Integration with rehab levels: This framework aligns
with the three rehab levels I introduced in this LinkedIn post. In brief:
Options
1 & 2 are typically used in Level 1
Options
3 & 4 in Level 2
Option
5 in Level 3
Non-linear progression: This is not a strict
step-by-step progression. Earlier stimuli can still be maintained as newer ones
are introduced, depending on individual needs. I generally include at least two
different tendon adaptation stimuli in a program at any time. These don’t need
to be frequent—1-2 times per week each is usually sufficient. Early rehab may
require more, while later stages focus more on training, skill, and power
development.
Push (overcoming) vs. Hold (yielding) Isometrics: A
key decision is whether to use push (overcoming) or hold (yielding) isometrics.
Push ISOM but in my opinion external force must be monitored to track
tendon load—especially in early rehab when intensities are lower. Hold ISOM is
my preference in early rehab (unless force can be monitored) since it provides
controlled loading. Later I bring in push ISOM at high intensity which achieved really high muscle activation.
Manipulating contraction time: Longer contractions at
lower intensities are generally better tolerated initially. If ultrasound
imaging shows discrete areas of pathology, I use longer duration stimuli to
maximize stress relaxation.
Exercise variation &
positioning: For Achilles rehab, don’t only perform standing calf
exercises. Include different knee angles to bias various subtendons and ensure all
the tendon is loaded. The total number of variations should be balanced with
overall training load.
Why isotonic loading is omitted: While isotonic
exercises can promote tendon adaptation (depending on the prescription), I
primarily use them to improve neuromuscular control and power output rather
than tendon adaptation.
Explosive isometrics (RFD stimulus): I haven’t
included rapid isometric contractions (where the person contracts as quickly as
possible for a short duration) because I view them as a neuromuscular stimulus
to improve rate of force development (RFD) rather than a tendon adaptation
strategy.
Long-term maintenance: Once out of rehab, I aim to maintain
high-intensity isometrics and some eccentric work to keep tendon adaptation. Once
per week for each is generally enough.
Thanks for reading! Look forward to comments and thoughts on
social media.